Cub Cadet FAQ's
|
Operation Instructions |
|
Brinly Moldboard Plow |
| Model
PP-500 Series |
| PREPARING PLOW FOR USE:
The plow bottom must be cleaned so dirt will slide off
the moldboard without sticking. Wipe the polished surface with a rag soaked
in turpentine, naptha, or gasoline. An old brick or a pumice stone can also
be used to remove the protective coating, but usually this is not necessary
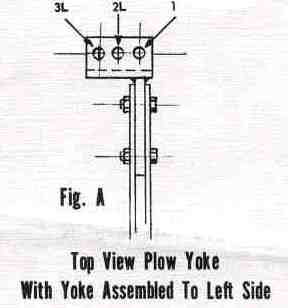
if soil is not too wet. IN order to maintain a proper plowing cut width,
refer to Figures A & B and chart.
|
 |
 |
Measure inside distance between rear tractor wheels -
refer to following chart for proper hitch attaching hole.
| NOTE: When
extreme plowing conditions are encountered (or whenever wide, high flotation
tires are used) it may be desirable to reduce the width of plow cut. (for
example, 8" or 9" wide with a 10" plow or 10"-11" with a 12" plow). This can
be accomplished by hitching plow (1) or (2) holes over to the left from
recommended setting given in charts. |
Inside Dim. Inches Between
Rear Tractor Wheels |
Plow Size |
| 8" Plow |
10" Plow |
12" Plow |
| 18" |
Use Hole #1 -
Fig. A |
Use Hole #2R -
Fig. B |
|
| 20" |
Use Hole #2L -
Fig. A |
Use Hole #1 -
Fig. A or B |
Use Hole #3R -
Fig. B |
| 22" |
Use Hole #3L -
Fig. A |
Use Hole #2L -
Fig. A |
Use Hole #2R -
Fig. B |
| 24" |
|
Use Hole #3L -
Fig. A |
Use Hole #1 -
Fig. A or B |
| 26" |
|
|
Use Hole #2L -
Fig. A |
| 28" |
|
|
Use Hole #3L -
Fig. A |
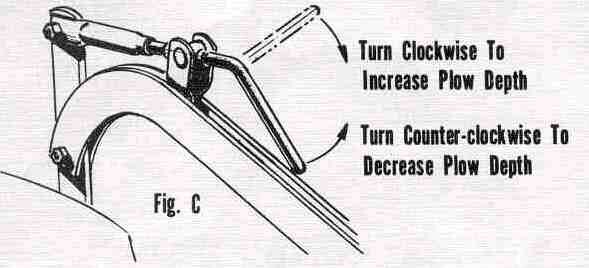
| DEPTH ADJUSTMENT:
The plow point pitch or suck is controlled by depth
control crank. Turning this crank clockwise will cause plow to go deeper,
counter-clockwise shallower (Fig. C).
|
|
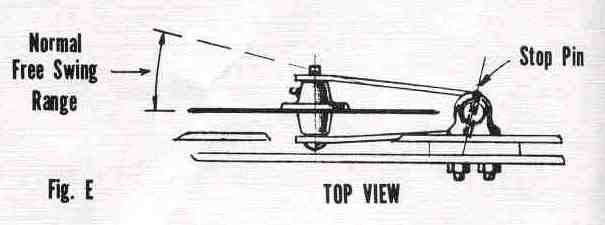
COULTER ADJUSTMENT:
Coulter should be adjusted to slice 2"-3" deep. While
making this adjustment, the coulter limit stop pin should also be set to
prevent coulter from swinging into plow beam or bottom. If properly
adjusted, coulter will be free to swing outward a limited amount from beam
but will not be free to swing in to touch plow beam or bottom (Fig. E).
|
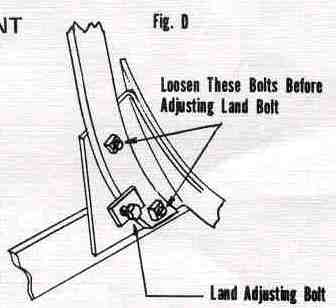
| LANDING ADJUSTMENT:
The plow bottom will react similar to a
rudder while ground engaged. If plow point is too far from left of beam,
plow will tend to over cut and leave a ragged furrow wall. This condition
can be readily corrected by making the following adjustment: Loosen 2 bolts
attaching plow bottom ti standard - turn land adjusting bolt clockwise two
turns – retighten plow bottom attaching bolts securely. Repeat adjustments
as necessary until plow follows correctly and proper width of cut is
reached. (Fig. D)
|
|
WHEN TO PLOW:
Make sure the ground is in proper plowing condition
before starting. Never plow when the soil is wet. If it is too dry, it will
be difficult or the plow to penetrate he soil. Avoid low places, old
roadways, paths and other places where the soil is overly packed. Expect to
have trouble with thick sod which has not been plowed in several years.
However, by finding the correct setting at the coulter, the hitch and the
turnbuckle, you should be able to a satisfactory job under most conditions.
High weeds or grass should be cut down with the rotary mower before plowing.
|
TO BEGIN PLOWING:
This plow generally works best at a depth equal to about
1/2 of its cutting width, i.e., 8" plow 4"-5" deep, 10" plow 5"-6" deep, 12"
plow 6"-7" deep.
To turn the plow point into the ground when opening the
furrow, use the depth adjustment crank (Fig. C). Adjust plow point downward
until a satisfactory penetration is accomplished.
NOTE: Be sure tractor hitch is properly
adjusted so as not to hold plow out of ground when tractor lift lever is
lowered.
After the dead furrow has been made, level the plow by
running the right tractor wheels in the previous furrow. Adjust depth control
crank (Fig. C) until the plow landside heel runs 1/4" - 1/2" from the bottom of
the furrow.
NOTE: When the right tractor wheels are
in the furrow, the plow hitch is designed to level the plow in the proper
horizontal angle.
Lay out your field to be plowed, and, if
possible, make it rectangular in shape, about 3 tiles as long as it is wide.
NOTE: It is easier to plow a few long furrows than many
short ones. LEAVE SOME ROOM AT EACH END FOR TURNING YOUR TRACTOR.
Start plowing by laying off a dead furrows shown in the sketch below. (Fig. F).
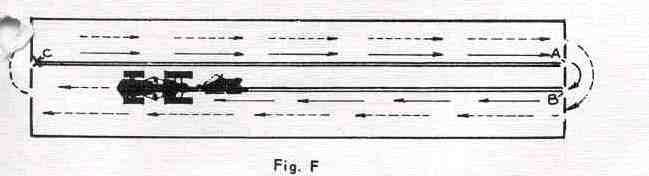
Begin at point "X" and plow a furrow to the end of your
plot. Fix your eyes on a tree or some distant object in line with the middle of
the plow so that you can guide your tractor and plow a straight first furrow to
point "A". NOTE: ALWAYS LIFT PLOW BEFORE TURNING,
and at point "B", lower it again and plow a dead furrow piling the dirt on top
of dirt from the first furrow. When you return to point "X" and start your real
plowing with both the tractor’s right wheels in the furrow at point "C", level
out the plow with the turnbuckle. Plow in a clockwise direction, always LIFTING
your plow at the end of the furrow before turning.
SPEED:
Do not plow fast. Move steadily along so that the earth
will turn over and not fall back into the furrow. In most soils, this is done at
full throttle in first gear. In light soils, plowing may often be done in
second gear, but if you go too fast, you will get an uneven plowing job and the
dirt is apt to be thrown instead of rolled over.
NOTE: When putting plow away, always
wipe polished surface and coulter blade with grease or oil to prevent rust –
replace badly worn plow shares.
Data provided by Steve Blunier, September 2002